
Saturday, June 30, 2012
Joanna sheen give away.
Well I just popped over to the JS site and had a peek at this weeks give away, its scrummy!
 Now I could do all sorts of things with this set! What about you?
MCS Sneak Peeks, and a Christmas card
Well, yet another card from MCS's new release on Tuesday, on QVC, and yet another of the cards I made whilst Banned from the pc and Craft room!
 The kit gives you matching shaped cards and toppers, but I do like to change things around a bit, so this card isn't meant to go together if you know what I mean?
Luckily the colours work across the range and mixing an Matching isnt too much of an issue as they are tonal. so its not an issue. So the Label topper with a different shaped Label card base. I took the base, and added some gold edged ribbon, coloured with a Caramel promarker. Placed the topper at a jaunty angle over the Top and added some gems, simple quick effective. Just needs a suitable insert and its ready to go. The shapes used on these toppers and card bases are actually on the My Craft Studio Nesting Shapes CD, and if you have a Cameo, or other programmable electronic cutting machine, then you can also use the trace feature, and cut your own card bases with out needing a die-cutting machine such as the GC, Cuttlebug, or Happy Cut.
 This is one of my Grab what you can cards! And is made with last years Hunky Dory set, that was in a tub I grabbed while being bodily forced out of here. A strip of Pre-embossed Snowflake cream card, and a 3 part topper, mounted onto a Purple card base. The Topper is actually DL sized, but with the matting and Layering, its a bit wider that ordinary DL, but not wide enough to be a Tall DL. So A custom Envelope will have to be made. Its simply highlighted with some Red, and Gold Cosmic Shimmer PVC Mica glue, on the flower centers and berries. I do like purple at Christmas, as this is the Traditional colour, that we used to have, Purple being the colour of Royalty. Father Christmas, St Nick, Santa all used to be dressed in Purple, until the Coca-Cola adverts!
Shows what an impact advertising has on our lives doesn't it?
anyway, enough of a rant from me, hope you like them, and dont forget to watch the TSV on Tuesday on QVC, and see what other goodies Steph has to offer us!
hugs, and I'll be back later with yet more, lol
Lou

Luckily the colours work across the range and mixing an Matching isnt too much of an issue as they are tonal. so its not an issue. So the Label topper with a different shaped Label card base. I took the base, and added some gold edged ribbon, coloured with a Caramel promarker. Placed the topper at a jaunty angle over the Top and added some gems, simple quick effective. Just needs a suitable insert and its ready to go. The shapes used on these toppers and card bases are actually on the My Craft Studio Nesting Shapes CD, and if you have a Cameo, or other programmable electronic cutting machine, then you can also use the trace feature, and cut your own card bases with out needing a die-cutting machine such as the GC, Cuttlebug, or Happy Cut.

Shows what an impact advertising has on our lives doesn't it?
anyway, enough of a rant from me, hope you like them, and dont forget to watch the TSV on Tuesday on QVC, and see what other goodies Steph has to offer us!
hugs, and I'll be back later with yet more, lol
Lou
Friday, June 29, 2012
MCS, sorry lost count!
right I have so many to show that I really neeeeeeeeeeeeeeeeeeeeed to get on with posting them, and the bigger problem, remembering which ones I have blogged and which ones I havent, DOH!
 This one is sooo Cute, and although the card base designs are the same across the set I hope I will show over then ext few posts that I havent duplicated any, fingers crossed, lol.
Right this is the window aperture card from the Nature set, which you can get on QVC on Tuesday 3rd July.
I trimmed the card topper to fit, just inside the window frame, and stuck it in place with some tape, then I took the Foiled frame I had removed and placed it on the outside of the window frame! This means extra emphasis is placed on the window aperture, and draws the eye into the card. The sentiment is curved to bow out from the card, and some beautiful gold edged ribbon was coloured carefully with a Forest Green promarker, turning it from white to match the card. I made a bow from the remains, and then finished it with 3 promarkered Gems to match. The tape is hidden with an insert on the inside of the card, and I really like it. Hope you do?
 This is another of the cards made while Banned, and a little bit different. this is a lovely Stamp set, which you can get from QVC and MCS, and is a set with Baubles and a wide border stamp. I stamped the Border onto a strip of double sided sticky stuff, and placed the acetate over one side, then I turned it over and did a Barbara Grey, using a craft knife to remove areas of the backing following the design so I could use different coloured glitters on the back, Bronze, Silver and Green in this case.
I then used the spell binders Holly Accent die and cut 2 borders without removing the die. I used the die as a guide to colour the Holly Leaves with my Holly Promarker. I then laid the strips down, and carefully inserted the strip into the curves so that it weaves under and over the die cuts.
I mounted it onto some Matted Dark green card, on a white card base, and added some red gems, job done, something a little bit different for someone this Christmas.
Right off to bed for me, lol
catch you all later, xxx
Lou

Right this is the window aperture card from the Nature set, which you can get on QVC on Tuesday 3rd July.
I trimmed the card topper to fit, just inside the window frame, and stuck it in place with some tape, then I took the Foiled frame I had removed and placed it on the outside of the window frame! This means extra emphasis is placed on the window aperture, and draws the eye into the card. The sentiment is curved to bow out from the card, and some beautiful gold edged ribbon was coloured carefully with a Forest Green promarker, turning it from white to match the card. I made a bow from the remains, and then finished it with 3 promarkered Gems to match. The tape is hidden with an insert on the inside of the card, and I really like it. Hope you do?

I then used the spell binders Holly Accent die and cut 2 borders without removing the die. I used the die as a guide to colour the Holly Leaves with my Holly Promarker. I then laid the strips down, and carefully inserted the strip into the curves so that it weaves under and over the die cuts.
I mounted it onto some Matted Dark green card, on a white card base, and added some red gems, job done, something a little bit different for someone this Christmas.
Right off to bed for me, lol
catch you all later, xxx
Lou
Krafty Hands first Blog Challenge
Well a mate 'o mine, the lovely Linda is working really hard with the Krafty Hands guys, who have just set up a blog and challenge site all of their very own!, I do know of Krafty Hands, and if you like me are a bit of a magpie, chances are, if you are in the UK, you will have picked up one of their disks somewhere along the lines, probably at one of the shows, they're the ones with the big blue Hands!
So if that rings a bell with you, then dig out the disks and get Krafting! The guys need us to enter their challenges to win prizes and kudos!
So after much Mithering by my Mate, I have finally completed my challenge card, so hopefully I can have a breather, and try and catch up a bit with the OTHER things I should be doing at this moment, such as stroking Hubby's ego, on his second day of returning to the work force! Flippin' men, you'd think he had a hard life the way he carries on!
Anyway, here's the card I made for the guys challenge, Red, White and Blue:
 Okay sue me I'm still in Christmas phase, okay?
In fairness I have been making all sorts of cards, but all the new Christmas craft gear is coming out round about now and it is swaying me somewhat!
So this is from the CD Holly and Snowflake, a cute Polar Bear, look just take my word for it will you? It's not my fault he has his head stuck in the stocking! And Holly, the fairy, who is valiantly trying to pull his tail off trying to get him out!
This is actually from the decoupage section, although I didn't want the background that came with the design, preferring to use one of the scrummy Snowflake papers on the disk instead.
I printed the paper out onto some supersmooth Card by MCS, and used the Cheery Lynn die Mega Doily Royal Coved Rectangle Die to create a base layer for both the main image, and the base of the Easel. I layered them onto a Tall DL card base, and scored to create the Easel.
Carefully, I cut out the decoupage, and used some Imagination Crafts Sparkle medium, to cover the red of the stocking for Bling, and used some of the Imagination's Mica paints for Holly's wings and the Bell. The final layer of the legs were sprayed lightly with Crafters Companion Iridescent Sparkle Glitter spray.
I took a 1/2 metre of bright red Organza ribbon and made a 3 layer bow, and then heated it with the heat gun until it crinkled, as I really like that effect, and mounted that at the top of the card.
The base stopper was from my stash, though I have to admit, that I had to hunt to find my Glitter Card, and Mirri Card! The mirri is from one of C&C's packs last year, some lovely mirri effect card bases, in an assortment of colours and designs, these are pre-printed with designs in white, so they arent too powerful. Luckily I had a red with the Baubles and greeting, so I matted a strip onto a piece of the Discarded base card, and then to finish added 3 two layer snowflakes in white and blues to the base from Glitter card.
So a Red, White and Blue Christmas card for you guys, hope you like it?
this is to be entered in the following challenge:
Krafty Hands Red, White and Blue Challenge
Hugs
Lou, xxx
So if that rings a bell with you, then dig out the disks and get Krafting! The guys need us to enter their challenges to win prizes and kudos!
So after much Mithering by my Mate, I have finally completed my challenge card, so hopefully I can have a breather, and try and catch up a bit with the OTHER things I should be doing at this moment, such as stroking Hubby's ego, on his second day of returning to the work force! Flippin' men, you'd think he had a hard life the way he carries on!
Anyway, here's the card I made for the guys challenge, Red, White and Blue:

In fairness I have been making all sorts of cards, but all the new Christmas craft gear is coming out round about now and it is swaying me somewhat!
So this is from the CD Holly and Snowflake, a cute Polar Bear, look just take my word for it will you? It's not my fault he has his head stuck in the stocking! And Holly, the fairy, who is valiantly trying to pull his tail off trying to get him out!
This is actually from the decoupage section, although I didn't want the background that came with the design, preferring to use one of the scrummy Snowflake papers on the disk instead.
I printed the paper out onto some supersmooth Card by MCS, and used the Cheery Lynn die Mega Doily Royal Coved Rectangle Die to create a base layer for both the main image, and the base of the Easel. I layered them onto a Tall DL card base, and scored to create the Easel.
Carefully, I cut out the decoupage, and used some Imagination Crafts Sparkle medium, to cover the red of the stocking for Bling, and used some of the Imagination's Mica paints for Holly's wings and the Bell. The final layer of the legs were sprayed lightly with Crafters Companion Iridescent Sparkle Glitter spray.
I took a 1/2 metre of bright red Organza ribbon and made a 3 layer bow, and then heated it with the heat gun until it crinkled, as I really like that effect, and mounted that at the top of the card.
The base stopper was from my stash, though I have to admit, that I had to hunt to find my Glitter Card, and Mirri Card! The mirri is from one of C&C's packs last year, some lovely mirri effect card bases, in an assortment of colours and designs, these are pre-printed with designs in white, so they arent too powerful. Luckily I had a red with the Baubles and greeting, so I matted a strip onto a piece of the Discarded base card, and then to finish added 3 two layer snowflakes in white and blues to the base from Glitter card.
So a Red, White and Blue Christmas card for you guys, hope you like it?
this is to be entered in the following challenge:
Krafty Hands Red, White and Blue Challenge
Hugs
Lou, xxx
MCS post 3....................
Hmmn, Decisions decisions.................What to show you this morning?
 This is a wonderful Kit! Again the Nature part of the kit is Owl based, and beautiful! And this card is all diecut for you so all you have to do is pop the bits out and put them on! From the card base itself, to the little hangers for the 3 pictures.
In my family there are 2 Teachers, my Stepmother, and my Great Aunt, so Owls are a good Stash Theme for me, as they traditionally represent wisdom and Teachers, and these Owls are cute!
It is really easy to put some lovely cards together with this kit. This one was made with the addition of one co-ordinating ribbon strip from another sheet, and all the bits from the kit sheet, but don't go throwing the empty sheets away! There's a couple of cards I made with the "Scraps" to show after!
 Now to one of the cards made while banned.....
This had previously been die cut from an insert from a used Christmas card, and stuck in my bits drawer, which was one of the few things I grabbed on eviction. The die used was Spellbinders Labels 20, and I edged the diecut with a gold pen and added a bit of glitter which you cant see on this picture.
The backing paper is a floral Pabric sheet, a cross between Fabric and paper, as it has the texture of a woven fabric, but is made of paper obviously. I matted a piece of it to some gold mirri card, as it suited the theme I was aiming for, an older type of card, but with a modern twist., and mounted it on the left hand side of my Lilac Card base. the die cut insert was placed on top of a small strip of |Lilac dotted ribbon from my tub of small ribbon bits. During my eviction I did receive the fabulous Christmas flowers bundle from a previous MCS QVC show, so trimmed the bottom 2 "branches" from one of the sprigs, and managed after a bit of a struggle, to tie the remaining piece of dotted ribbon, around it and the base strip to secure it in place. I edged the card base with a gold marker pen, and then added 3 gold gems to the bottom Right just to finish it off, There's enough room left for a sentiment, if I want to put it on, but I don't know, it might upset the balance of the card.
What do you think?
Hugs
Lou, xxx

In my family there are 2 Teachers, my Stepmother, and my Great Aunt, so Owls are a good Stash Theme for me, as they traditionally represent wisdom and Teachers, and these Owls are cute!
It is really easy to put some lovely cards together with this kit. This one was made with the addition of one co-ordinating ribbon strip from another sheet, and all the bits from the kit sheet, but don't go throwing the empty sheets away! There's a couple of cards I made with the "Scraps" to show after!

This had previously been die cut from an insert from a used Christmas card, and stuck in my bits drawer, which was one of the few things I grabbed on eviction. The die used was Spellbinders Labels 20, and I edged the diecut with a gold pen and added a bit of glitter which you cant see on this picture.
The backing paper is a floral Pabric sheet, a cross between Fabric and paper, as it has the texture of a woven fabric, but is made of paper obviously. I matted a piece of it to some gold mirri card, as it suited the theme I was aiming for, an older type of card, but with a modern twist., and mounted it on the left hand side of my Lilac Card base. the die cut insert was placed on top of a small strip of |Lilac dotted ribbon from my tub of small ribbon bits. During my eviction I did receive the fabulous Christmas flowers bundle from a previous MCS QVC show, so trimmed the bottom 2 "branches" from one of the sprigs, and managed after a bit of a struggle, to tie the remaining piece of dotted ribbon, around it and the base strip to secure it in place. I edged the card base with a gold marker pen, and then added 3 gold gems to the bottom Right just to finish it off, There's enough room left for a sentiment, if I want to put it on, but I don't know, it might upset the balance of the card.
What do you think?
Hugs
Lou, xxx
Thursday, June 28, 2012
Antique................
Well that's the theme for another part of the Paper Stash Kit on Tuesdays QVC shows!
 When Diane asked me to choose a part kit, I was torn between the Antique and the Owls, which are the Nature set, so she was kind enough to let me play with both.
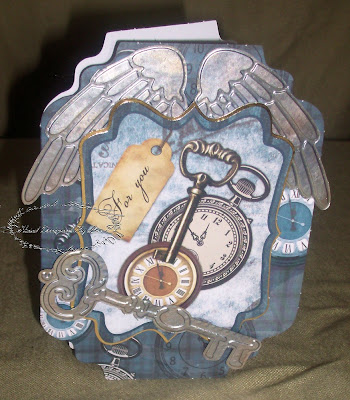
This one is from a Shaped card kit, but not actually the right shaped topper, now I have told you you can see it cant you, lol.
So I knew what I wanted to use on these cards, but obviously I cant go too OTT with them, as they are supposed to be examples, and inspire you.
This one was the one I had to do! Out came the tin foil from a tub of coffee, My Happy Cut, and the Cuttlebug cutting and embossing Folder, with wings, pointy fingers and Keys! So once they had come out of the folder, I attacked them with my Ranger Alcohol inks, Gold, Blue, and Red. Mixed them together on the blending pad, and dabbed away until I was satisfied.
Pinflair holds it all in place, lol, good old Pinflair, its one of the few "glues" that can hold metal, and It was just a case of positioning and arranging the bits for the card to be done.
The kit is very old, almost steampunk in theme, based on old clocks, so there are some more bits to show later, well quite a few in all honesty, I got a bit carried away!
Next up is another of the cards I did while banned from the craft room:

A different colour scheme for Christmas, but I think it works!
Actually Beggars cant be choosers, I couldn't get much card stock, and grabbed all the wrong colours, lol.
So last years Pilkington Lane Christmas stamp, Stayzon Ink pad, and some acetate. I had a piece of my treasured Gold Pearlised card stock, and I am in dire need of more, but cant remember who the supplier is, and I wrapped the aceate around the back of the card, allowing it to bow out at the front. To trim simply some Black Gems that came from Poundland of all places! The card is only small, 3"x 4.5", but I do like it, something a little bit different!
Hope you will pop back later, for more sneaky Peaks of the MCS Paper Stash kit, which will be on QVC in the TSV shows on Tuesday,
xx
Lou
what I have been up to.......
Well here's the first in a series of posts to show what I have been upto, while being kicked out the craft room, and struggling with the FM...............
I set off a few weeks ago to go to Dad's to collect the new unit, and on the way down, I did stop off at My Craft Studio. Well I had to really, either I took the scenic route through Woodhead Pass, and co-incidentally MCS Towers, or I took the much quicker but boring route, Via the motor way. Now as a crafter which would you take? Exactly!
So I went in with youngest in tow, he loves to craft, and nosey in craft shops, so much so that he's quite a well known little person in crafty circles. And he adores Diane Peternell, at MCS. Well she spotted him, and knew that I was in without even seeing me, lol, and she popped out of the office to ask me to do a favour for her. Well who wouldnt, if they were asked so here is one of the cards I made with the Brand new Paper Stash Kit they have asked me to show you..............
 Isnt he cute? He is from the Nature part of the Paper Stash Kit, which will be available on Monday 3rd July throughout the day on QVC. MCS is the Todays Special Value (TSV) and Steph will be demonstrating the kit, and card craft for us all. This kit comes with pre-scored card bases, as well as foiled and non foiled diecut toppers.
So I took the stepper card base, and folded it along the score lines. Added the foiled pre printed ribbon, to the front step, and mounted the big owl picture behind on the main card area. Next I took 2 of the small unfoiled toppers, and cut and scored a piece of strong acetate, to form springs for them to bounce on.
I punched some flower shapes from some of the extra card from around the toppers with a tonic flower punch, and made the small flower to match the green in the ribbon, and mounted it next to the sentiment. Finally I coloured 3 medium sized gems with a promarker, and added them to the ribbon. A cute card that you just want to boing! As hubby and kids have been having a bit of a play every time they see it, sigh!
Right as I am so behind on posts I am also going to post about cards I made with no pc, when I got kicked out of here, so hubby could sort it, with every card I post for MCS, so you have plenty to look at and think about, lol.
 This was a foiled pre scored and cut card base from one of the Kanban Kits last year, and is a lovely shape to work with as you can do it all sorts of ways.
I took a piece of 6x6 core-dinations card stock, and embossed it with the Snowflake Mask from Touch of Mica in my Happy Cut.
I sanded it back to expose the core, and trimmed it to fit the central panel. Then cut around the inside edges of the two foiled baubles to allow me to slide the corners in underneath before fixing it in place with DST.
Left over from last year are some pre-printed foiled vellums, by Papermania, from the Henbury Lane Quote book. I mounted it on top of the sanded core card, with some lovely Rivets from Friskars, there ones are stars, to match the stars on the card base. The pieces I had trimmed form the core card were then mounted as panels for the 2 sides to complete the card.
Now do Bear in mind, that I had very little to work with, on my own cards as everything was packed away by hubby, as I was frantically deciding what to grab! So Christmas is the theme from me for the next posts of my own cards, and not a promarker in Sight!!
I do hope you will join me in Watching Steph on QVC on Monday. I know she is working really hard to get Crafting on QVC as proper shows with proper demonstrations. And in all honesty, I CANT wait for the 13th of July, a whole days workshop with Stephanie and Nancy, and loads of goodies and giggles, and then a day or two,lol, of shopping at Doncaster, maybe I can squeeze in some make and takes, as well as a good gossip!
have fun, and check back later for more of the cards I made from this yummy kit!
hugs
Lou
I set off a few weeks ago to go to Dad's to collect the new unit, and on the way down, I did stop off at My Craft Studio. Well I had to really, either I took the scenic route through Woodhead Pass, and co-incidentally MCS Towers, or I took the much quicker but boring route, Via the motor way. Now as a crafter which would you take? Exactly!
So I went in with youngest in tow, he loves to craft, and nosey in craft shops, so much so that he's quite a well known little person in crafty circles. And he adores Diane Peternell, at MCS. Well she spotted him, and knew that I was in without even seeing me, lol, and she popped out of the office to ask me to do a favour for her. Well who wouldnt, if they were asked so here is one of the cards I made with the Brand new Paper Stash Kit they have asked me to show you..............

So I took the stepper card base, and folded it along the score lines. Added the foiled pre printed ribbon, to the front step, and mounted the big owl picture behind on the main card area. Next I took 2 of the small unfoiled toppers, and cut and scored a piece of strong acetate, to form springs for them to bounce on.
I punched some flower shapes from some of the extra card from around the toppers with a tonic flower punch, and made the small flower to match the green in the ribbon, and mounted it next to the sentiment. Finally I coloured 3 medium sized gems with a promarker, and added them to the ribbon. A cute card that you just want to boing! As hubby and kids have been having a bit of a play every time they see it, sigh!
Right as I am so behind on posts I am also going to post about cards I made with no pc, when I got kicked out of here, so hubby could sort it, with every card I post for MCS, so you have plenty to look at and think about, lol.

I took a piece of 6x6 core-dinations card stock, and embossed it with the Snowflake Mask from Touch of Mica in my Happy Cut.
I sanded it back to expose the core, and trimmed it to fit the central panel. Then cut around the inside edges of the two foiled baubles to allow me to slide the corners in underneath before fixing it in place with DST.
Left over from last year are some pre-printed foiled vellums, by Papermania, from the Henbury Lane Quote book. I mounted it on top of the sanded core card, with some lovely Rivets from Friskars, there ones are stars, to match the stars on the card base. The pieces I had trimmed form the core card were then mounted as panels for the 2 sides to complete the card.
Now do Bear in mind, that I had very little to work with, on my own cards as everything was packed away by hubby, as I was frantically deciding what to grab! So Christmas is the theme from me for the next posts of my own cards, and not a promarker in Sight!!
I do hope you will join me in Watching Steph on QVC on Monday. I know she is working really hard to get Crafting on QVC as proper shows with proper demonstrations. And in all honesty, I CANT wait for the 13th of July, a whole days workshop with Stephanie and Nancy, and loads of goodies and giggles, and then a day or two,lol, of shopping at Doncaster, maybe I can squeeze in some make and takes, as well as a good gossip!
have fun, and check back later for more of the cards I made from this yummy kit!
hugs
Lou
Wednesday, June 27, 2012
Today WAS supposed to be
the start of me getting back to blogging, and working properly, so if you were expecting some sneak peeks, then you will have to wait until tomorrow!
Instead, I have some changes to my craft room to share. I got kicked off the pc, a few weeks ago, with 30 mins notice, so hubby could start preparing for my new craft storage unit. So there I was with what I had been able to grab very quickly, and you know what that means don't you, no craft mat, no craft knife, one roll of DST, and various bits, that were on top of the piles, u huh! Not enough to really complete one card let alone, the other things I should have grabbed!
Any way that was a couple of weeks ago, and I had just got the unit in last week, when I felt really tired..............so bout of FM hit, added to the bendy week I didnt realise I was on until later, and I tried to undo a door bolt with my heel, instead of bending down, and jarred my glass back! So been out of it a bit with Painkillers and FM. Normally I keep on top of my FM, and manage it well, but just lately with all the running around, to-ing and fro-ing across the country, hospital visits, and running up and down to Daughters house, (I knew there was an advantage to her being so far away!), it Crept up in me and laid me low. But now I am back.............. sort of lol.
I had just got the blomming Craft Room organised, when today, instead of sitting here doing loads of blogs, I got kicked out of it again, well when I finally got out of bed anyway, so Hubby and a friend of his could sort out the shelf under the table, that was SUPPOSED to be in when I got kicked out of here! and some more shelves so I thought I would share some pics of the work still in progress!
I am still trying to put away, but needed a break so am blogging while I recoup a bit of energy, and let the ribs stop complaining.


 Those of you who used to WOYWW here, will recognize this bit, lol, stacks of card and papers,
 4 shelves of card and papers. which need re-doing, mind you a restock is on the list at Doncaster lol, and finally down the bottom, my tins of stuff like Foam tape, and spare glues lol, things I dont access all that often


Instead, I have some changes to my craft room to share. I got kicked off the pc, a few weeks ago, with 30 mins notice, so hubby could start preparing for my new craft storage unit. So there I was with what I had been able to grab very quickly, and you know what that means don't you, no craft mat, no craft knife, one roll of DST, and various bits, that were on top of the piles, u huh! Not enough to really complete one card let alone, the other things I should have grabbed!
Any way that was a couple of weeks ago, and I had just got the unit in last week, when I felt really tired..............so bout of FM hit, added to the bendy week I didnt realise I was on until later, and I tried to undo a door bolt with my heel, instead of bending down, and jarred my glass back! So been out of it a bit with Painkillers and FM. Normally I keep on top of my FM, and manage it well, but just lately with all the running around, to-ing and fro-ing across the country, hospital visits, and running up and down to Daughters house, (I knew there was an advantage to her being so far away!), it Crept up in me and laid me low. But now I am back.............. sort of lol.
I had just got the blomming Craft Room organised, when today, instead of sitting here doing loads of blogs, I got kicked out of it again, well when I finally got out of bed anyway, so Hubby and a friend of his could sort out the shelf under the table, that was SUPPOSED to be in when I got kicked out of here! and some more shelves so I thought I would share some pics of the work still in progress!
I am still trying to put away, but needed a break so am blogging while I recoup a bit of energy, and let the ribs stop complaining.


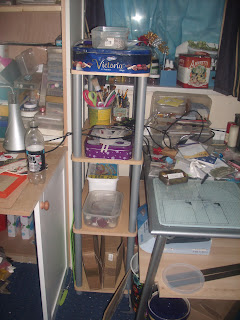
this WAS a walk in wardrobe, until hubby and Craig attacked it today, lol. now I have a very long shelf unit, above the sloping floor to the cupboard, and more shelves on top of that! Underneath is plenty of room for my 500 craft mags, and my boxes of Jiffy bags, , and Cello bags. then slightly in front of the shelf, is my red drawers.............
this at the moment is propped on some old books. To bring it into the same height as the table top, and shelf in the walk in wardrobe!On top of it is a small unit which is holding my Printer card and paper, and my inkjet printer, lol. There's just enough room for me to slide my wheeled stool into the gap so I can sit and type.

next up is the PC screen and my Craft Robo, and promarker blending sheets, and the corner of a small cupboard which has stuff like my Button Jars, Gel pens etc in, this area is still being organised properly, as its a nice big area which hubby and Craig just dumped everything on!

See what I mean? Its getting there slowly but surely, lol. This was my old Garden table, 5'x 3', and is glass topped which means that light manages to get through to underneath,

see? like this lol. This shelf runs the whole width and depth of the table, need to fill it up!

then of course theres the space under the shelf on the table! This is my Big boxes. Envelopes, Christmas stuff, cards ready to go off where ever, and stuff I haven't sorted out yet lol.

Now in the Gap left between the table and the unit Dad made for me, there's just enough room for ANOTHER set of shelves!

Now we get to the Unit Dad built for me, lol. I am waiting for 3 more shelves for this, one to split all the A4 storage boxes, as they are a bit heavy, and one to split the space underneath the shelf you can see, so I can spread things out a bit, make them easier to get to.

And a shelf to split the underneath area into two, so I dont have to pull all the boxes out to get to the bottom ones lol.
The doors open and form the support for the drop down top, which is a work area. Afraid my other chair hasnt been freed of the pile yet , lol, I will do it so I can sit there in the morning.

Here's a cheap but incredibly useful set of fixed baskets, it just sits by the side of me with things like my rulers in, and Plates for Happy Cut, and the next few shots havent changed, lol


Finally my little butchers block. This is normally where I photograph the cards, and its also a nice sturdy support for my foiler, and Ribbon straighteners, okay okay they WERE hair straighteners, NOW they are RIBBON Straighteners okay?
Oh I nearly forgot one photo!!

My Laser printer on its tv stand! And a couple of small shelves on the wall.
Right I'm off to do a bit more sorting, then I am off to bed lol, more sleep. Not quite over the FM yet, but mostly there fingers crossed, xx
Have fun all, will pop round and visit when I get a few moments, xxx
Friday, June 15, 2012
Hunni, I'm home..............
Hi guys,
well I have a pc, internet, no batteries for the camera, and a craft room, thats now fitted. but I'm still putting away, tryign to catch up with everything everyones been doing lately, will call round, probably tomorrow, and try and get some work done, lol
Hugs to all,
well I have a pc, internet, no batteries for the camera, and a craft room, thats now fitted. but I'm still putting away, tryign to catch up with everything everyones been doing lately, will call round, probably tomorrow, and try and get some work done, lol
Hugs to all,
Friday, June 08, 2012
I'm going to be away for a week
just a quick note to let you all know I am alive, but my craft room is being re-done and re-organised, so no crafting for me until next thursday friday, when everything is in its new home, xxx
Tuesday, June 05, 2012
sulking!! Button it!
Boy am I in a bad mood!! Mainly with BT and myself. Bt decided to play silly buggers which put me off line for 24 hrs, and I still dont have my phone back! Then I decided in my wisdom to load a new operating system, boy Was that a mistake!!Days of updates, and driver downloads, and I still dont have it all on, and then to top this off, I forgot to write this post!! Oh and I ungrounded youngest yesterday morning for the Jubilee street party then ended up grounding him again as he didnt come in on time, and deliberately disobeyed me!!
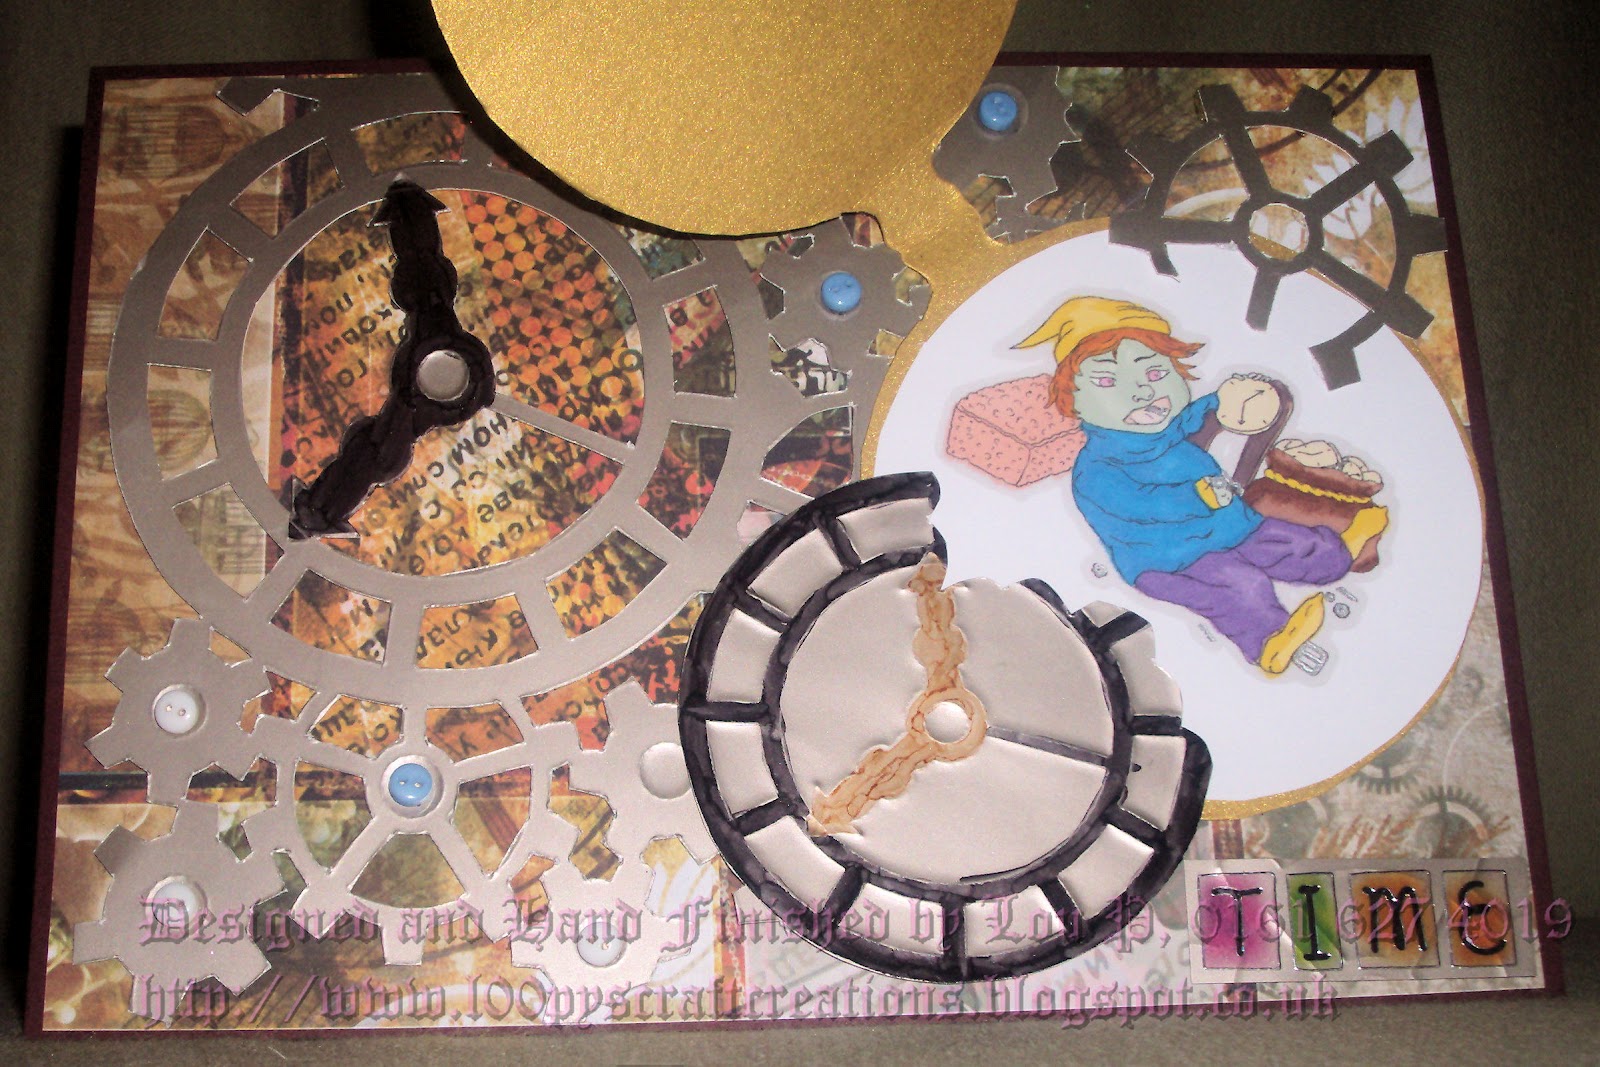
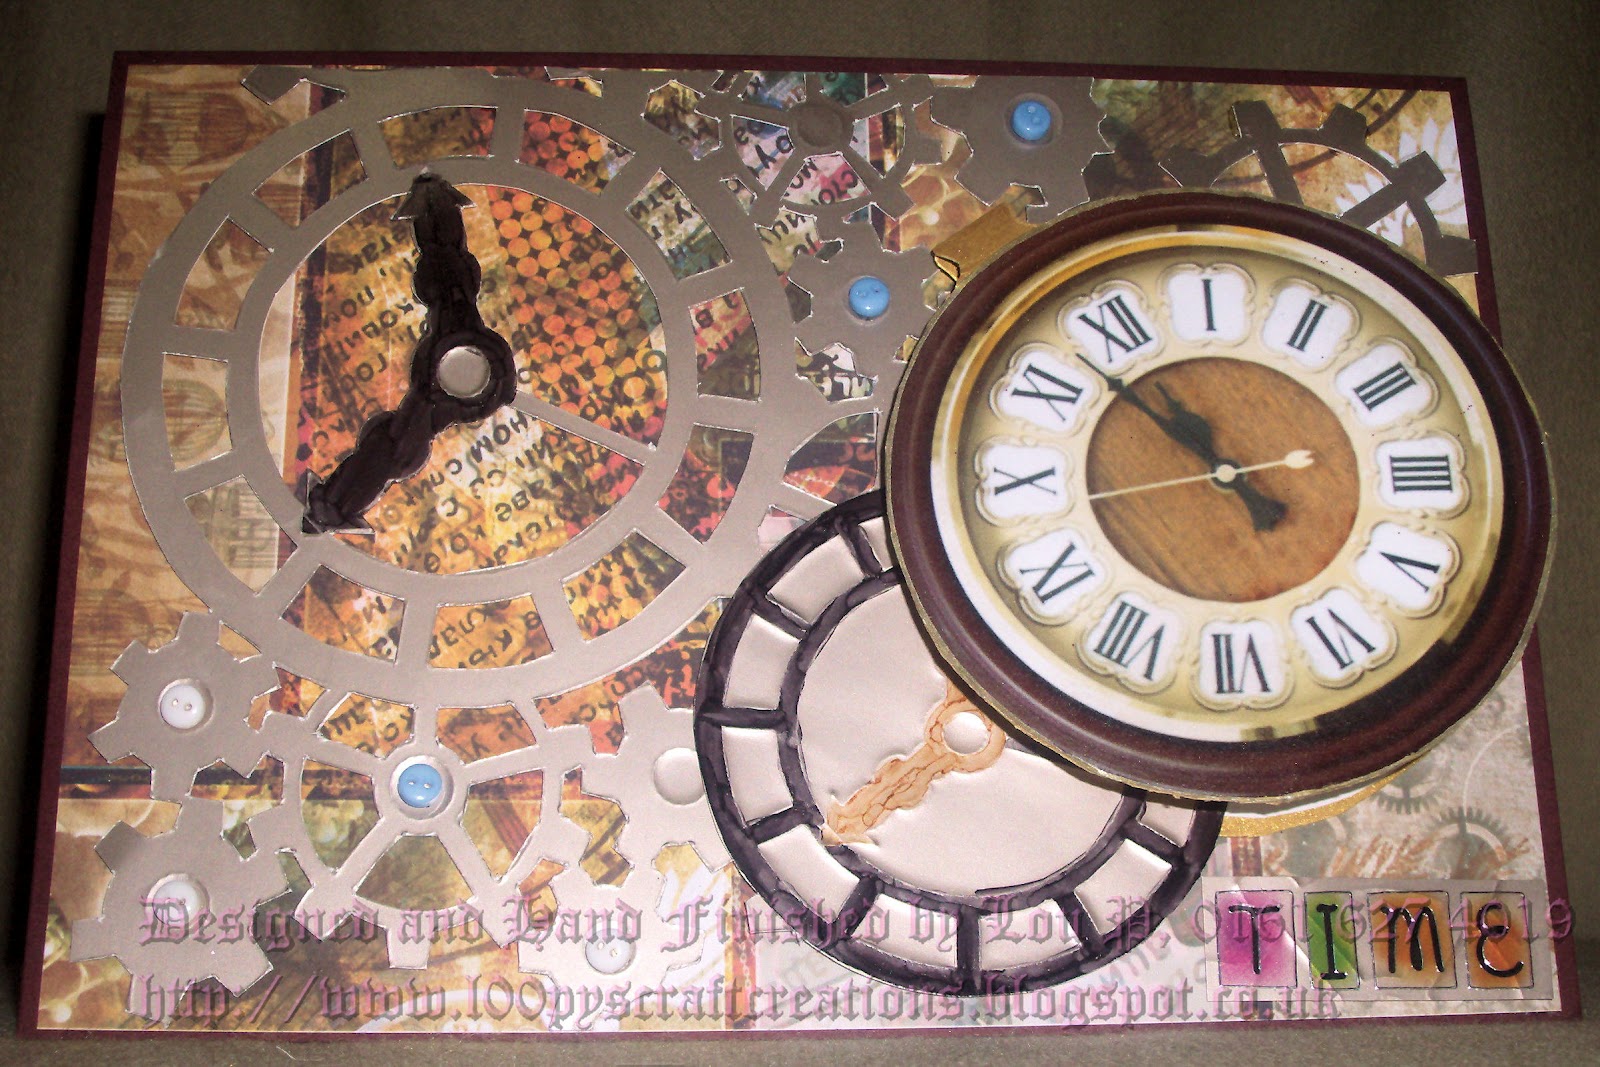
So heres my DT design for LEJ Designs this week, thank heavens I did the work on the photos before I reloaded, as this program is causing me some headaches!!


We have the The watch Gobbler from LEJ Designs, coloured with my promarkers, and a slight touch of silver Sakura pen. and a steam punk backing paper from My Craft Studio Steam Punk CD. Then on top we have some cogs and clock faces embossed onto silver Mirri paper, and cut out, from an A4 Mask from Touch of Mica. I added some colour to the hands with a couple of Promarkers.
The watch face is from My Craft Studio Steam Punk Cd, and I backed it onto some of my most precious Gold Pearlescent card, I am incredibly parsimonious with this , as I cant find the supplier I bought it from a couple of years ago, and I neeeeeeeeed more!!! I haven't found anything to match it, so the supplier is top of my most wanted list!!
then I placed the image onto the folded card, so that it can be lifted. The watch face itself has been sprayed with Crafters Companion Spray and Shine, which intensifies the colours from my inkjet printer. the separate cog, and watch face, have been nibbled into, and seem to be falling out of the watch so that you can see the Watch Gobbler in action.
Now the theme this week is Buttons! So my cogs are fastened to the paper with.....Buttons!! Inside the card it reads "Time..........For your birthday AGAIN!"
Hope you like it? I do I think its quirly, lol
Do pop over to LEJ Designs and have a look at the rest of my teamies work, then see what you can create with buttons, and you could be one of two prize winners this week, the first randomly drawn name will win 3 digi's of their choice from LEJ Designs


So heres my DT design for LEJ Designs this week, thank heavens I did the work on the photos before I reloaded, as this program is causing me some headaches!!
We have the The watch Gobbler from LEJ Designs, coloured with my promarkers, and a slight touch of silver Sakura pen. and a steam punk backing paper from My Craft Studio Steam Punk CD. Then on top we have some cogs and clock faces embossed onto silver Mirri paper, and cut out, from an A4 Mask from Touch of Mica. I added some colour to the hands with a couple of Promarkers.
The watch face is from My Craft Studio Steam Punk Cd, and I backed it onto some of my most precious Gold Pearlescent card, I am incredibly parsimonious with this , as I cant find the supplier I bought it from a couple of years ago, and I neeeeeeeeed more!!! I haven't found anything to match it, so the supplier is top of my most wanted list!!
then I placed the image onto the folded card, so that it can be lifted. The watch face itself has been sprayed with Crafters Companion Spray and Shine, which intensifies the colours from my inkjet printer. the separate cog, and watch face, have been nibbled into, and seem to be falling out of the watch so that you can see the Watch Gobbler in action.
Now the theme this week is Buttons! So my cogs are fastened to the paper with.....Buttons!! Inside the card it reads "Time..........For your birthday AGAIN!"
Hope you like it? I do I think its quirly, lol
Do pop over to LEJ Designs and have a look at the rest of my teamies work, then see what you can create with buttons, and you could be one of two prize winners this week, the first randomly drawn name will win 3 digi's of their choice from LEJ Designs
And the second randomly drawn name will win a fantastic bag of 20 mixed charms which has generously been given to us by our sponsor I'm Charmed
Im Charmed is a new company that started this year.
Im Charmed is offering a bag of 20 mixed Charms to the winner
Im Charmed is offering a bag of 20 mixed Charms to the winner
There's also a monthly prize of a free digi for those of you who use an LEJ Designs digi, and there are some lovely designs in there!!
Hugs to all, I'm going to take my bad mood out on the pc next, I WILL get it to work properly!!!
Lou
Friday, June 01, 2012
Polka Dot Bikini
Well its time for another short hop around the Scrapbook Stamp Society Team. We aren't really fans of big hops they can take too long, so we like to keep ours short and sweet, this weeks theme is Polka Dot Bikini.
 In the UK one of the first songs played on Radio One was A Yellow Polka Dot Bikini by Bryan Hyland, and epitomises British Sixties youth culture, every one knows it. This coupled with the lovely image by Concetta Kilmer, which you can get from the Scrapbook Stamp Society Shop and its a card for a more mature lady friend.
If you have arrived here from Nataliya then you are on the right track to continue but if you have just arrived here from blogger land and would like to hop along with us then please start back at Scrapbook Stamp Society.
Today's project is simply a card, designed with an older woman in mind, its a bit Jokey, and is meant with a light heart.........

I am really into light bright colours at the moment, hence the lemon colours I have used as a background and card base.
So the main image was actually printed on my Laser printer, so that I could foil the outline and frame, with a nice bright hot red which I carried into the design with the sun Umbrella, coloured with my promarkers Berry Red, Crimson, and Gold.
The sea was coloured using Cyan, and Azure, with small marks of Cold grey 3 to give me an idea where the waves would be.
The sand is Honeycomb, and Ginger, the sky Pastel Blue, Powder blue, and the sun Gold, Tulip Yellow and Daffodil Bloom.
Now to the nicely tanned tortoise...lol Caramel and Cinnamon for the skin, Shale and Henna for the shell, with a tiny touch of Pastel green for the eyes.
I did use the Blender pen on areas of the sand and sea, mainly because the beach and the sea are rarely a nice uniform shade, and the blender removes the colour as well as blends colours together, then a touch of clear glitter for the waves on the sea, and the Topper is done.
Now I have shed loads of backing papers, and in all honesty probably 2 warehouses of Digital backing papers, which I must admit, tend to be my immediate resource when crafting, rather than flicking though a couple of hundred backing sheets. So Docrafts Digital Designer to the rescue, and the wonderful collection that is Papermania Capsule Collection were the source for my Yellow Polka dot backing papers.
Okay, next on my agenda was the Polka Dot Bikini........Some satin Ribbon in white, a Tulip Yellow Promarker, a pair of scissors, some yellow embroidery thread, and some silicon glue!
The Yellow dotted ribbon started out white, but again the Tulip Yellow Promarker, over the top and it changes colour very nicely, the chorus from the song as the sentiment, and a light hearted birthday card for a female relative, just make sure you can run faster than they can!!
Okay so next on the list for the hop is:
The lovely Gill: http://creationsbygillm.blogspot.com
I do hope you have been inspired by the creations from my self and my Teamies, and that you'll call back for our next short Hop next week at Scrapbook Stamp Society.
Hugs to all
Lou
Subscribe to:
Posts (Atom)